10 DIY seed pot ideas, household, recycled, reuse, pepurpose
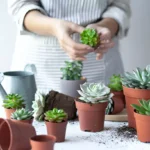
I always think about reusing things around the house to implement them. Repurposing things you find in the garbage is an excellent replacement for throwing them away. Doing so saves time, effort, and money. Late winter to early spring is the ideal time to plant seeds. Planting your seeds indoors during this period will result in healthy seedlings. If you want to avoid buying seed pots for seed germination, you can use some unnecessary things around your house. This way you can make considerable financial savings.
Let’s spend a few minutes writing about making a seedling pot or tray by properly using unnecessary household items. We will make pots for seedlings from seeds with things lying around the house that will surprise you.
Let’s take a quick look at 10 such seed pot ideas before getting into the detailed process:
1. Newspaper Seed Pot
2. Cardboard Paper mache Pot
3. Toilet roll
4. Eggshell Pot
5. Egg tray
6. Juice/Milk carton
7. Coffee/Teapot
8. Fruit peel
9. Small bottle
10. Seedling trays from paper cardboard
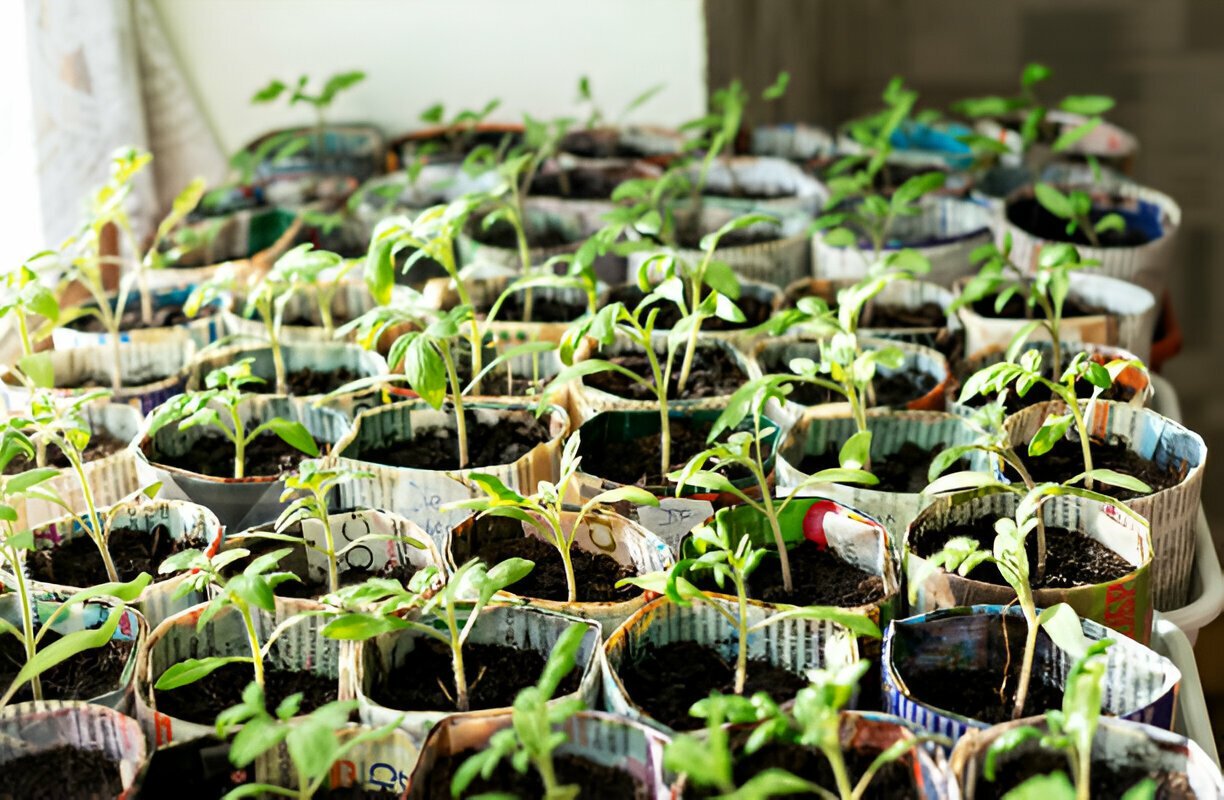
Newspaper Seed Pot
We will make seed pots out of old newspapers at home. We will not use magazine paper because these papers are pretty glossy.
Materials:
- Paper/Newspaper
- Glue
- Scissors
- Small round jar/plastic pipe/toilet roll
Procedure:
Take the newspaper and fold it lengthwise in the middle. Cut the fried part with scissors. The newspaper will be divided into two parts.
Take a cut portion and spread the portion evenly on the table. Then grab hold of the newspaper, place the little jar at the end, and flip the jar over. That will make the paper round with the jar.
When the whole paper is rounded in the jar, glue the part of the paper on the upper surface of the jar well and close the parts on the inside of the jar where there are extra parts of the paper. Paper seedpots are used to sprout your seeds in minutes.
Cardboard Paper mache Pot
In this method, we will not use regular paper or paper; we will only use brown colored cardboard paper.
Materials:
- Cardboard paper
- Scissors
- Pot/small pot/container
- Flour
- Blender machine
- Water
- Cotton cloth (to absorb water)
Procedure:
We will start with cardboard paper. Cut the cardboard papers into small pieces with scissors. We will do as much as possible with scissors. We will take a small pot/container. We will cut the cardboard into the pot/container. Now, wet and fill it with water so the cardboard can get wet. Soak the pieces of cardboard paper in water for at least 24 to 48 hours. At least you should soak for 24 hours. We’ll transfer the pot to the blender jar after an entire day’s work. Blend it for 4-5 minutes and make it thick and crunchy like chutney. We will take it out of the blender along with the water and drain the water well using the cotton cloth we took. If the water takes a little time to drain, we will give it that time. If we stir it, it may take more time to drain all the water, and we will not get the perfect paste. Once the water is drained, we will mix the paste with a small quantity (presumably) of flour. Now, we will take any pot we want to use the soap and apply a small amount of cardboard paper paste. Once fully applied, we will let it dry in the sun. Once dry, our cardboard paper pot is ready.

Toilet rolls
Let’s use the toilet rolls lying in our house.
Materials:
- Toilet rolls
- Scissors
- Tape
Procedure:
I will take the toilet rolls. I cut four 1-1.5-inch pieces around the bottom of the pot with scissors to make it easier to fold. I will fry the cut part and fasten the fried part with tape. Our seed pot is done. Now, you fill three-fourths of the seed pot with soil, taking care not to fill it all up with soil, now make a small hole with your fingers and sow the seeds. Water the seeds lightly with a layer of soil.
“These seed pots are perfect for growing lettuce, broccoli, and coriander.”

Egg Cartons
We bring more than a dozen eggs. Most of the time, these eggs are used as a meal. After eating the eggs, we put the egg cartons in the bin, but now we will not throw them away; we can do seed germination in them.
Materials:
- Egg carton
- Stiff stick for cutting (I used scissors)
Procedure:
Add the empty carton of eggs and crack it with a glass head on the bottom. You can use any hard stick if you don’t want to use scissors. Excess water will drain out through the drainage holes. These pots may be used to plant small seeds.
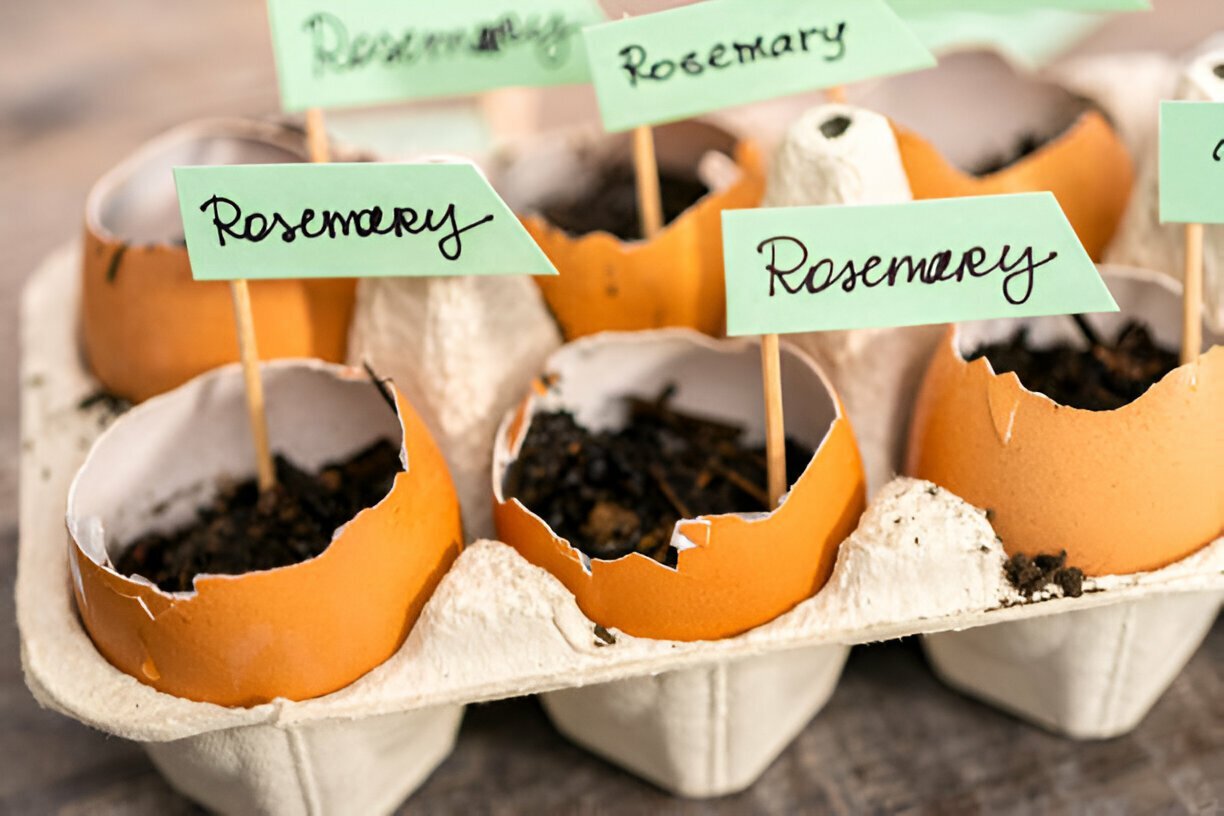
Eggshell Pot
Eggshells are rich in calcium. We can use eggshells for plants in different ways.
Materials:
- Eggshell
- Scissors or chopsticks
Procedure:
Carefully remove the insides of the eggshells. To keep the shells intact, we will round some part of the upper part of the eggshell and break it to remove the yolk inside.
I will dry the eggshells in the sun. If we use them after drying, there is a risk of breakage.
Then, gently make a hole with a chopstick. (may break if pressed hard) The seed pot for sowing our seeds is done. We put a seed inside an eggshell. When the seedling is done, we will show it outside with the seed tape from the eggshell without lifting the plant from the soil.
Eggshell Fertilizer
Related: 5 Homemade Fertilizers For Your Gerden | Organic | Easy to Make
Juice or milk container
We always have 1/2 containers of juice or milk in our fridge. I never throw them away and use them in my garden or for crafts I know many gardeners like me do. I enjoy making these container seed pots.
Materials:
- Juice or milk container
- Scissors
- Chopsticks or sticks
Procedure:
Empty the juice or milk container and clean the inside with water. Otherwise, ants may come and destroy your seeds. With scissors, split the freshly rinsed container in two Then, your two seeds are potted. Remember to use a chopstick or stick to probe the bottom of your containers. You can easily sow 2-4 seeds in these pots.
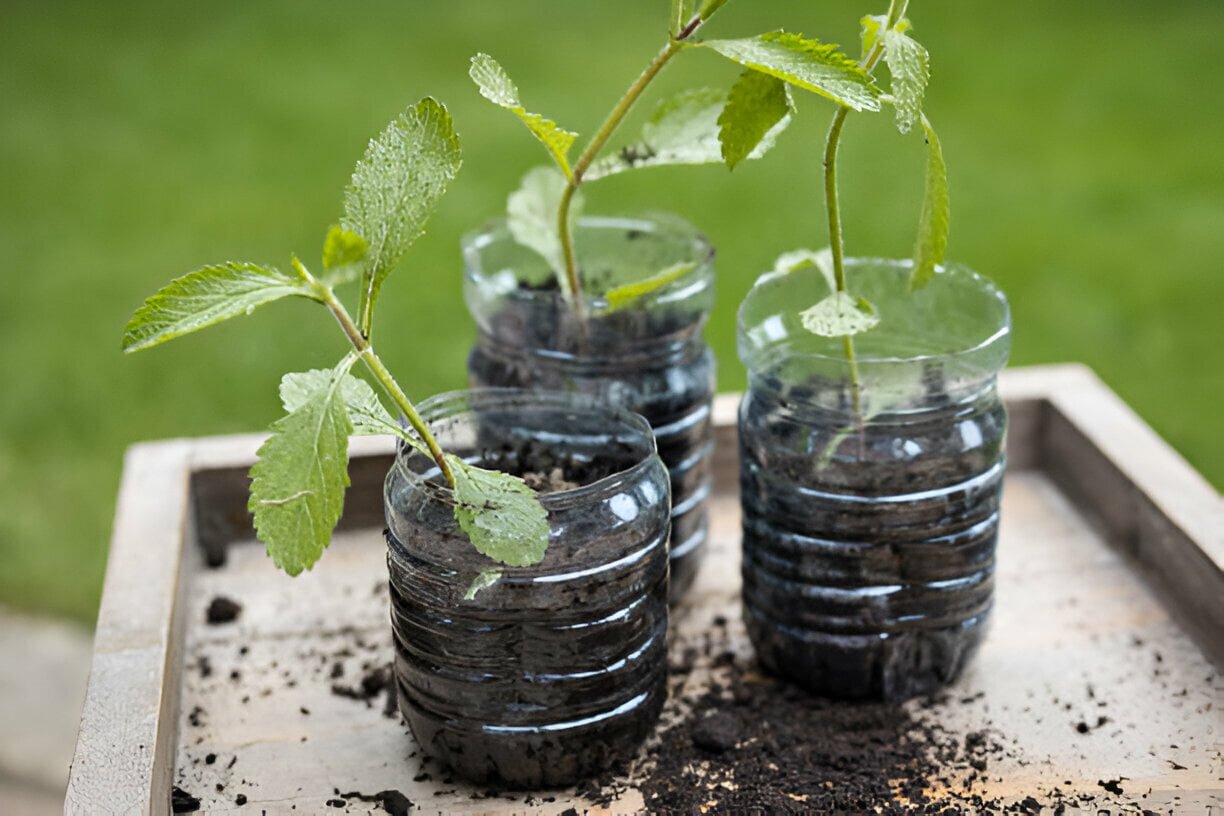
Plastic bottle
Plastic bottles of different sizes and shapes are used in our house, but we will select small size bottles for making seed pots.
Materials:
- Plastic bottle
- Scissors
- Soldering iron (you can use an iron tip)
Procedure:
I will take a small plastic bottle of 100-250 ml. Cut off the bottom third of the bottle with scissors, and make 3-5 holes in the remaining bottom part using a soldering iron to ensure proper drainage. If you don’t have a soldering iron at home, you can use a small iron from the kitchen. Press the heated iron end on the plastic bottle’s bottom.
You can also use the upper part if you want. If you don’t, we can make a hanging pot with it. We will make two holes on the top of the bottle with a soldering iron, one on each side. Now, we will tie the two ends with rope and make a drainage hole in the mouth of the bottle. Our hanging pot is done.
Paper coffee cup
If you have a coffee habit outside the office, collect the cups after your coffee. Because these coffee cups of yours are going to be seed germination pots.
How to make it?
Materials:
- Coffee cup
- Soldering iron or chopsticks
Procedure:
We will start by rinsing the coffee cups with water and then drying them in the sun. If the coffee cup is paper, we can easily seal any leaks with a chopstick. However, if it’s plastic, we can use a soldering iron to seal the leak at the bottom of the cup. This method can be applied to various types of cups, such as tea, noodles, yogurt, and more. Ince these cups are tall, you can plant tomatoes, eggplants, and strawberries.
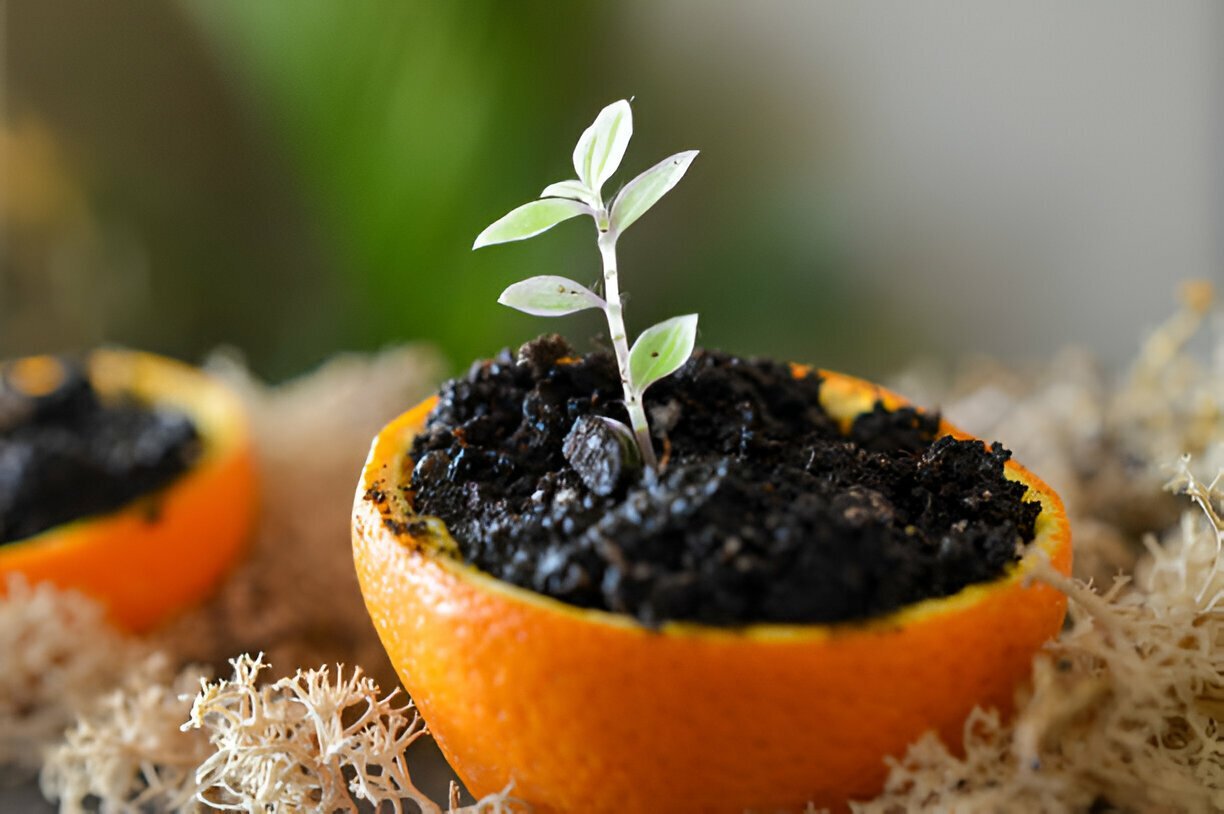
Citrus Rind Seed Pot
Before you throw away citrus peels, if I tell you that they are very functional and eco-friendly, you will not throw them away but start collecting them. Let’s see how we can make homemade pots with citrus peels.
Materials:
- Orange fruit
- Knife
- Chopsticks
Procedure:
We will round any side of the orange fruit and remove the peel with a knife. Then, carefully remove the sweet and sour fruit cells inside (the part we eat) so as not to damage the citrus peel.
We will make a 3/4 hole in the lower part of the citrus peel with the help of chopsticks. After watering, we can fill the pods with soil for planting and sow the seedlings. We can replace these citrus peel seed pots with a small pot to drain the excess water, as it will leak. Once the seedlings have germinated, we can sow them outdoors with the pods. If you want, you can make a seed pot with the peel of fruits like lemon, pomelo, tangerine, grapefruit, etc.

Seedling Trays from Paper Cardboard
We learned how to make pots using the above method. The pots should be placed on a tray. Otherwise, taking us from one place to another will take time. The excess water from the pots may damage the floor of our house; we can not allow this to happen, friends.
We will make a tray to keep these pots again with unnecessary things lying around our house.
Materials:
- Square cardboard paper
- Stapler Machine
- Plastic polyethylene
Procedure:
We will take a square cardboard, which can be used in any box lid shape. The reason for taking this is that we don’t have to make a border around it. We will take the board and cover the entire board with plastic polythene. After that, I will pin each corner with a stapler and connect the board and polythene. Now, you can easily keep the seed pots in this tray; you can water it, and even if excess water comes out, your floor or room will not get damaged, and the paper cardboard will not get damaged due to polythene.


Bonus Tips
When the seedlings are outgrown in their containers, you can prune them back or use them in our salad which will give the salad a more nutritious boost. Transplanting healthy seedlings outside increases their chances of survival in the sun, wind, and rain.”
If the seed pots are placed in a south-facing window, keep them until daylight arrives and after a few hours, move the seed pot trays from side to side. It gives enough light to the plants and helps them to grow faster.
Before taking the seedlings outside, I think you should acclimate the seedlings to the outside environment. 2 weeks before you take the seedlings outside, set up a fan 1-1.5 feet away from the seedlings to provide air and allow the seedlings to learn to tolerate the wind. On the one hand, the air resistance of the seedlings will increase; on the other hand, the roots will be strong. Place the seedlings outside in the sun for a few hours. Take the seedling tray and place it in your greenhouse or in a place without direct sunlight but with enough bright light. Practice keeping them for a few hours daily; this will acclimate your seedlings to the outside sun and greatly reduce the chance of them dying when you transplant them outside.”
Some Common Questions
Best seed starting potting soil?
I always make seed starter potting soil for seed germination. Ten times better than anything you can buy at nurseries or on Amazon is homemade potting mix for seed starters. I prepare soil for seed germination by mixing 50% cocoa coir, 25% perlite, and worm castings 25%. This mix is what I use for vegetable, herb, and fruit-flower plant seed germination. Talking about the success rate, I got good results with this medium because it contains sufficient nitrogen, medium moisture, and air movement, which plays a vital role in germinating seeds.
How many seeds per pot?
Usually, I put 2-3 seeds in a pot. If the seeds are not mature, germination can sometimes be missed. There shouldn’t be any issues if there are two to three little seedlings in the pot.
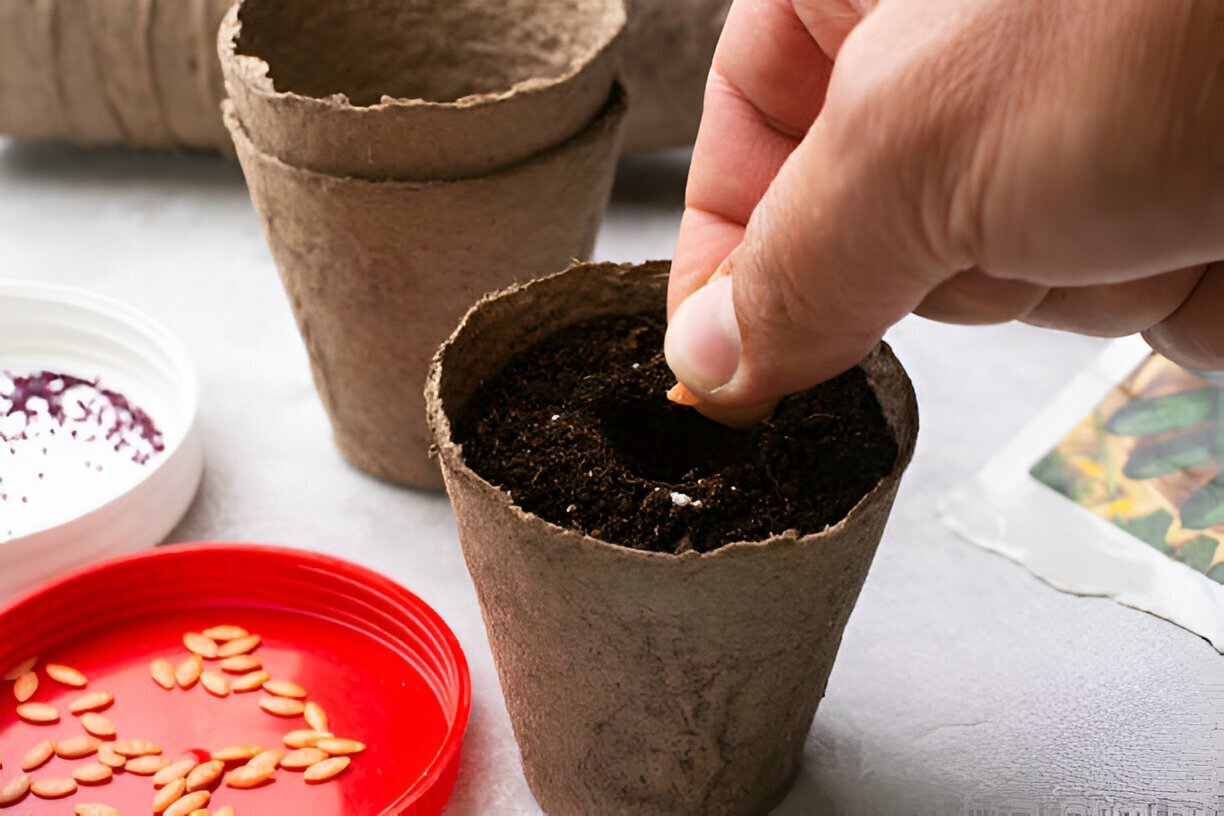
How to germinate pot seeds?
Add the seed starter potting mix to your seed pots, and ensure that you do not fill the pot with the medium. Now, you remove some of the medium with a chopstick or your finger in the middle of the pot (make a hole). Next, you put 1-3 seeds in the hole. In the last step, you cover the seeds with a small amount of medium so that new leaves sprout from the seeds. That is the easiest and most common method of seed germination. Make sure you keep the indoor seed germination zone between 65-85°F.
How do you germinate seeds fast?
It depends on various factors. Examples include seed type, moisture, Environment, temperature, etc. But you can use the simplest method to germinate any seed quickly. The method is the paper towel method. Try it.
When to plant from seed?
Before planting from seed, you must know what seed you want to sow. Sowing can be done based on weather and environment. Seeds should be sown in temperate regions in early spring when frost does not occur. You can sow by looking at the sowing month written on the seed packet.
What do pot seeds look like?
The smallest seed pots have a diameter of two to three inches. These pots are used only for germinating seeds. After the seeds have germinated and the transplanting time is reached (usually 10-20 days but may vary), the seedlings are transplanted into another pot, container, or raised bed.
What kind of sunshine is needed to get seedlings from seeds?
12-15 hours of light are required. Use grow lights if you’re planting seeds indoors and don’t get enough light.
Where to buy pot seeds?
In America, seed pots are available at local plant stores, nurseries, and big box stores. They are also available online at various websites.